LC Tank: Polypropylene Film Capacitor Bank
The induction heater uses a workcoil as a step-down transformer. This transformer steps the voltage down, but increases the available current to the workpiece, which is the one-turn coil that completes the transformer. The magnetic flux is coupled to our workpiece. The better the coupling, the more efficient is our workcoil. The closer the workpiece is to the coil the better the energy transfer.
This is the workcoil and tank. The capacitors are high voltage metallized power film snubbers.

The workcoil is made from shaping the 3/8" copper tubing. I use brass compression fittings to attach it to the LC tank. The tank is made from two 1" x 3/16" thick copper bars. I drill holes in the bars to accommodate the capacitors. We need a capacitor that can handle several hundreds of amps of current. I purchased some pulse capacitors with current ratings of 14A, 3000vdc, 750vac. With 20 capacitors this is close to 300A average current. The coupling transformer fits over the copper tubing. If you look closely, you will see the fountain pump submerged in water. This pumps ice water through the tank and back out into the bucket. Water flows in from the bottom left, through the copper pipe soldered to the bus bar, through the coil, over the bank to the upper left, and through the tubing connected to the other bus bar, and out on the upper right. You should also take note where the workcoil connects with the capacitor bank. It does not connect both leads at the front end; instead, the coil connects to opposite ends. This ensures that the capacitors share an equal current load. Otherwise, if both end connected to the front, the capacitors closest to the coil would handle the brunt of current because the resistance would be the least. When you are dealing with hundreds of amps, small changes in R are significant.

These are the bars with the holes drilled in them. The tank uses 20 capacitors, but you can use any number that gives you the capacitance and current handling capacity that you require.

First, you need to determine what operating frequency you will use. Higher frequencies have greater skin effect (less penetration) and are good for smaller objects. Lower frequencies are better for larger objects and have greater penetration. Higher frequencies have greater switching losses, but there is less current going through the tank. I choose a frequency near 70khz and wound up with about 66khz. My capacitor bank is 4.4uf and can handle over 300A. My coil is near 1uH. The capacitors are from Illinois Capacitors. Mine are 0.22uf/3000vdc. The model number is 224PPA302KS.
Fres = 1/2π√(LC)
Once you wind your coil you can get an idea of its value by making a simple RLC circuit with it and connect it to a function generator and scope. I used a 1R resistor and a 500pf capacitor. I increased my function generator sine wave and measured the voltage across R. At resonance the LC impedance drops and the voltage drop across R peaks. This gave me a ballpark figure, but you can just go by the calculation.
Now, as far as the workcoil goes you can form the workcoil by driving a piece of PVC tubing into the ground. I used a 1" pipe (1.5" OD). Take the copper tubing and fill it with sand or salt. Make sure it is completely filled. This way it will act like a solid tube and will not collapse when you bend it. Fix one end with something like a heavy vice and work the tubing around your PVC tube until you have your desired number of turns. Four to five turns at 1.5-2" will give you a coil with an inductance between 0.8 - 1.3 uH.
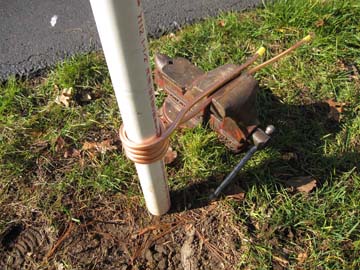

You can see how nicely the coil forms around the pipe. Once you are happy with the turns and shape you can blow the sand out with an air compressor.